
Google Ads UTM Tracking: Tag, Test, Verify
Tagging campaign URLs, keeping click identifiers intact through redirects, and verifying attribution data ensure you measure performance accurately before spending budget. When campaign parameters fail to reach your analytics platform, marketing teams end up making budget allocation decisions based on incomplete or misleading numbers. Missing attribution often remains unnoticed until monthly reports show large spikes in unassigned traffic or unexplained discrepancies between ad spend and recorded conversions. To set up Google Ads UTM tracking correctly, first confirm your Google Ads account is linked to your Google Analytics 4 property. Next, enable auto-tagging in your account settings and select a direct advertiser-domain landing page for your ad destination. Trnqify helps draft campaign tags and measure redirect clicks, though a generic short link is not a replacement for a direct paid ad destination. Establishing a repeatable tagging protocol protects your data stream, letting you tie conversion revenue back to specific campaigns, ad groups, and keyword themes without guesswork.

Before You Start: Separate Auto-Tagging From UTMs
Google Ads auto-tagging and manual UTM parameters perform different but complementary jobs. Auto-tagging adds a Google Click Identifier, or gclid, to an ad’s destination URL after a click. In some cases, the GCLID is created at impression time, and the same identifier is reused if that user clicks the same ad again. When auto-tagging is on and a Google Analytics tag is installed on your website, Google stores the GCLID in a Google Analytics cookie on your site’s domain. Auto-tagging supports website conversion tracking and the import of Google Ads campaign and cost data into Analytics, while also providing platform-specific dimensions such as campaign, keyword text, and query.
Meanwhile, manual UTMs let you label traffic sources and campaigns in Google Analytics, where their values appear as dimensions in reports. When you use manual tagging and auto-tagging together, Google Analytics uses auto-tagged values for source, medium, and other traffic-classification dimensions if the GCLID can be used as intended. If it cannot be used as intended and at least one UTM parameter is present, Analytics derives all cross-channel traffic-source dimensions from the UTMs alone; missing UTM parameters appear as (not set) in reporting. Because manually tagged utm_content and utm_term values populate the Manual Ad Content and Manual Term dimensions, respectively, use auto-tagging for integrated Google Ads reporting and UTMs to keep manual naming consistent.
Relying exclusively on auto-tagging leaves non-Google reporting tools in the dark, because third-party data platforms can’t derive campaign details from the opaque gclid string. Conversely, relying solely on manual UTMs leaves out Google Ads’ native campaign and cost imports in GA4 and can limit the conversion data available to automated bidding, while impression share remains available in Google Ads reporting. When both systems work simultaneously, GA4 uses the gclid to import cost data and user interaction metrics while preserving manual parameters for external tools and secondary reporting dimensions. That dual setup provides an operational safety net for your attribution data.
Step 1: Set a Consistent UTM Naming Convention
Consistent campaign-tag formatting helps keep reporting clean. Because UTM values are case-sensitive, differently capitalized values are treated as distinct, which is why Google Analytics recommends lowercase values as a standard practice. Thus, utm_source=Google and utm_source=google are different source values in Google Analytics, so inconsistent capitalization can fragment reporting.
Draft your core parameters before opening the ad platform. For paid search traffic, standardizing on utm_source=google and utm_medium=cpc keeps channel reporting clear. Next, build a descriptive campaign slug like utm_campaign=us_q4_2026_nonbrand_search to identify the region, timing, and targeting strategy at a glance. Adding utm_id={campaignid} passes the numeric Google Ads identifier into Analytics, helping map manual data back to the platform. Including utm_source_platform=google_ads explicitly designates the advertising platform within GA4, ensuring cross-channel reports differentiate paid search clicks from other sources. Only append utm_term and utm_content when your reporting team has a documented use case for them. Missing values often appear as (not set) in your reports, making completeness as important as consistency.
Establishing strict naming conventions across marketing teams requires clear syntax rules. Using underscores or hyphens instead of spaces prevents messy URL encoding, which turns spaces into %20 characters that make links harder to audit. Maintain a shared campaign dictionary so every team member formats campaign names in the same structural sequence, such as market, time frame, and campaign objective.
To simplify this process, Trnqify includes an in-app AI UTM Assistant that translates a plain-language campaign brief into these exact parameters. After you provide a summary of the campaign, the assistant outputs a properly formatted tag sequence. Reviewing those drafted values against your taxonomy before applying them to a live ad prevents early attribution gaps. To understand how these parameters interact across different marketing channels, review how to separate a UTM source from a medium before finalizing your rules.
Step 2: Add Parameters in the Final URL Suffix
Instead of pasting UTMs directly into the ad’s Final URL field, leave that field for the clean destination path like https://www.example.com/pricing. The correct location for tracking parameters is the Final URL suffix field, which automatically appends your tags to the clean URL when a user clicks the ad. Placing tracking strings directly into the Final URL makes future updates tedious and increases the risk of ad re-reviews whenever a campaign label changes.
A properly configured suffix looks like utm_source=google&utm_medium=cpc&utm_campaign=us_q4_2026_nonbrand_search&utm_id={campaignid}&utm_source_platform=google_ads. The bracketed token is a ValueTrack parameter, meaning Google Ads replaces it with the actual numeric ID of the campaign at click time. ValueTrack parameters allow Google Ads to populate dynamic campaign values automatically, removing the need to generate custom tracking links for every single ad variant. Keep the auto-tagging system responsible for generating the gclid, as hard-coding a static click identifier into your suffix will break conversion attribution. Static identifiers fail because Google Analytics relies on the GCLID associated with an ad click to connect that interaction with resulting website activity and conversions.
Google Ads allows you to configure the suffix at the account, campaign, and ad group levels. Applying the suffix at the campaign level ensures the specific slug reaches the landing page without being overridden by a generic account-wide setting. Setting your parameters at the campaign level also makes it simple to alter campaign names or regional identifiers without touching account-wide tracking defaults. Lower-level suffix settings override higher-level settings, so an ad group suffix replaces a campaign-level suffix rather than appending to it.
Testing the effective URL with the Test button in the Google Ads interface confirms the assembly of the URL and validates that the tracking settings combine correctly. The built-in testing tool simulates parameter insertion, helping you catch syntax mistakes such as missing ampersands or malformed ValueTrack tags before traffic begins flowing. However, while this tool verifies that Google Ads built the string properly, it does not prove the string survives the journey to your server.
Step 3: Test Redirects and Use Short Links Carefully
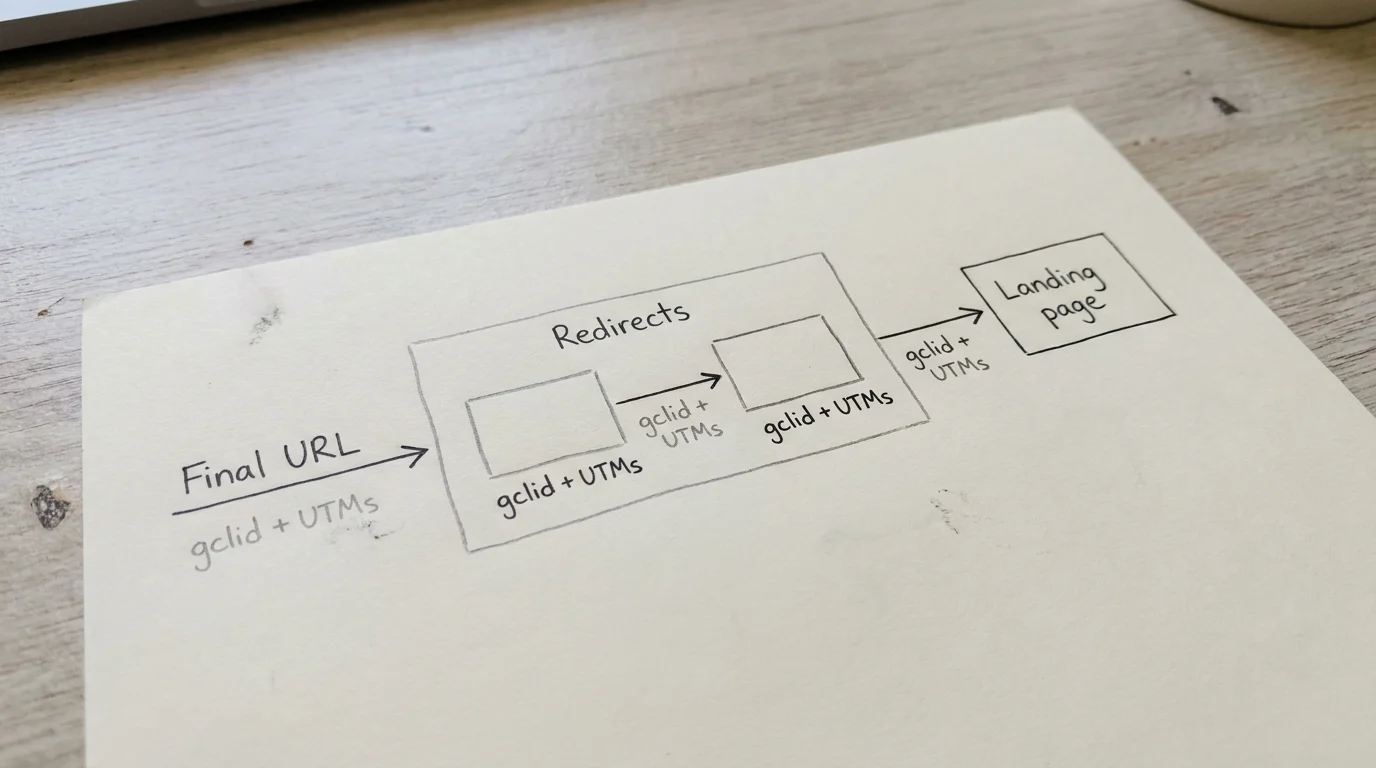
Because the platform interface test only checks URL assembly, performing an independent check of the live browser redirect ensures your server configuration preserves the tracking data. Production web servers often contain internal redirect rules that drop incoming query parameters, causing complete loss of campaign attribution before the page even loads.
Start by building a test URL with dummy values, using a string like https://www.example.com/pricing?gclid=test&utm_source=test, and pasting it into a private browser window. If the final resolved URL in the address bar drops the test parameters, your redirect configuration is stripping query strings, which breaks click attribution immediately. To find the exact failure point, turn on the “preserve log” setting in the Network tab of your browser’s developer tools, load the URL, and click through the document requests to see which hop drops the parameters. You can inspect each HTTP redirect status code, such as a 301 or 302, to determine whether your web server, load balancer, or content delivery network is responsible for stripping the query string.
Check whether a short-link route sends users to another domain, because Google’s June 2026 update to the Destination Requirements Policy says redirects from an ad’s final URL to a different domain are allowed in certain circumstances with prior approval. The update gives as an example a consumer packaged goods manufacturer redirecting users to a pre-approved list of retailer destinations where the advertised product is available for purchase. It was posted on June 23, 2026, and will take effect in early July 2026.
Trnqify manages shareable placements where short links are appropriate, such as newsletters, social media profiles, and automated developer workflows via MCP or our REST API. For those use cases, Trnqify logs redirect clicks without cookies or tracking scripts on the shared links. The platform provides link-level analytics for your non-paid channels, allowing your paid search campaigns to rely safely on direct URLs and the Final URL suffix. Separating short links on external platforms from direct advertiser URLs in Google Ads keeps your paid tracking stable while maintaining flexible measurement across earned and owned channels.

Step 4: Verify Attribution and Save a QA Record
Once the ad is live, verifying that data flows correctly into your reporting tools establishes a baseline for performance. Check that expected clicks register against the campaign in Google Ads, and review the acquisition reports in GA4 for the corresponding sessions. Waiting several days to verify reporting can lead to wasted ad spend if tracking has failed silently from the moment of launch.
Creating a compact QA record makes this check repeatable. Document the campaign name, campaign ID, direct Final URL, and exact suffix used, alongside the resolved landing URL from your manual browser test. Noting whether the UTMs and click identifier survived the redirect chain, along with the interface test results, prevents future debates about data quality. If a stakeholder questions a campaign’s performance months later, you can pull the QA record to prove the tracking was functional at launch. Maintain this log in a shared repository where marketing and analytics teams can reference historic parameter configurations whenever reporting anomalies arise.
Reviewing these reports requires distinguishing click metrics from session metrics. A redirect-level link click, a Google Ads click, and a GA4 session measure different events at different times, so exact parity across these three numbers is not required for a successful setup. Normal variance occurs frequently due to user behavior, browser privacy settings, and connection speeds. A user might click an ad multiple times within a short window, creating several ad clicks but only a single analytics session. Alternatively, slow mobile connections may prompt a user to abandon the page before the analytics script fires, registering an ad click without an accompanying session. Understanding these structural differences prevents unnecessary configuration changes when data variances stay within expected technical tolerances.
Troubleshoot Parameter Loss and Reporting Gaps
When attribution fails, isolating the symptom points you toward the correct fix. If the final landing page lacks the necessary query parameters, finding the specific redirect hop that drops the query strings allows your development team to configure the server or Content Delivery Network to forward all inbound parameters on that path. Common culprits include web server rewrite rules that omit query string append flags, or trailing slash redirects where example.com/page redirects to example.com/page/ while dropping everything after the question mark. Fixing a stripping issue at the server level is safer than manually hard-coding a click ID into your links.
If campaign data shows as (not set) or splits across multiple rows in GA4, checking your capitalization first is the fastest diagnostic step, as a single uppercase letter creates a new reporting row. Reviewing the effective suffix settings in Google Ads also confirms whether a lower-level ad group suffix is replacing the intended campaign-level suffix. Missing values frequently result from one configuration level overriding your intended tags. For example, if an ad group contains an empty suffix field or an incomplete manual string, it overrides the comprehensive suffix defined at the campaign level, causing missing data in GA4.
Treat significant gaps between click and session counts as a diagnostic clue rather than immediate proof of failure. A user might click an ad, triggering a Google Ads click, but close the browser before the GA4 script executes, resulting in a click without a corresponding session. Ad blockers can similarly prevent the analytics script from firing while the ad platform successfully records the click. Client-side routing in single-page applications can also strip search parameters before the page view event finishes processing. Confirming parameter survival in the browser and checking the expected GA4 dimensions ensures the tracking system itself functions properly.
Keeping UTMs alongside auto-tagging maintains clear campaign labels when applied through the Final URL suffix. Testing that your redirects forward those parameters to the final page, relying on direct advertiser domains for paid ad destinations, and documenting the results ensure every campaign launches with measurable, accurate tracking.
Trnqify is a privacy-first AI link shortening and UTM campaign tracking platform. Draft consistent campaign tags with the AI UTM Assistant, organize your short links, and measure clicks across your non-paid channels without cookies. Start organizing your campaign links at Trnqify.