
How to Test UTM Parameters Before Launch
Testing a tagged URL requires more than seeing the correct text in a link builder. To test UTM parameters before launch, check that the URL parses correctly, the link shortener preserves the tags through the redirect, and the destination measurement system records the visit under the intended campaign.
If any part of that chain breaks, campaign data can be missing or misattributed in your reports. A malformed URL or redirect may prevent the tags from reaching the landing page, while inconsistent naming can split the same campaign across multiple rows. Finding these issues after launch can leave gaps in your attribution data.
Before testing, gather the exact destination URL, a decided naming convention, and a clearly identifiable test click. Access to the destination analytics property is also necessary to confirm the final reporting. Drafting the tags serves as the first step, whether by building the URLs manually or generating them with the in-app AI UTM Assistant on the Trnqify homepage. This tool works as both a UTM builder and a UTM checker: it generates the tagged URL from your prompt, then lets you validate every parameter before distribution. Trnqify records shared-link clicks at redirect time without cookies or tracking scripts, giving immediate feedback. That redirect data measures link activity, but testing the full journey proves the analytics platform receives the campaign data.
What a Pre-Launch UTM Test Proves
A complete test checks the link across three distinct stages. First, the parameter string needs to conform to web standards. The key-value pairs have to join the existing URL using the correct delimiters, encode any reserved characters, and sit entirely before any fragment identifier.
Second, the redirect needs to deliver those parameters to the landing page intact. Link shorteners, publishing platforms, and destination servers all have the opportunity to alter a URL, which means a short link that correctly forwards a user might still strip the query string in the process. The pass condition for this stage is the intended destination loading in the browser with the exact UTM parameters visible in the final address bar.
Third, confirm that the destination analytics system maps those values to the correct campaign dimensions. Trnqify measures clicks when the short link redirects the user. However, a short-link click can register even if the destination never receives the tags or records a session, because destination analytics systems rely on the landing-page URL. Testing the entire path helps confirm that the user, the redirect, and the analytics tracking behave as planned.
Step 1: Confirm the Destination and Naming Plan
Start with the exact landing page URL you intend to use, including any existing query parameters and fragment identifiers already present on the page. If the destination is https://shop.example/sale?variant=blue#details, that entire structure needs to remain intact when you add the tracking data.
Define the parameters before generating the link. A standard configuration uses three main fields: utm_source to identify the specific traffic source, such as a newsletter; utm_medium for the broader channel, such as email; and utm_campaign to name the initiative, as Google’s URL-tagging guidance explains. An optional utm_content field helps distinguish individual creatives or link placements within the same campaign.
Maintain one consistent naming style across all fields. A consistent lowercase style helps prevent fractured reporting because Google Analytics treats parameter values as case-sensitive. For example, in a report using Session campaign, Spring-Launch and spring-launch can appear as separate values.
Keep the campaign name consistent across different placements for the same initiative. A newsletter link and an Instagram story can share the same campaign value while using different source, medium, and content values to indicate exactly where the visit originated. If the team struggles to maintain this discipline, take time to establish consistent naming rules before generating live links.
Quick Reference: UTM Values by Channel
Use this table as a starting point when defining your parameters. Adjust values to match your team’s naming convention, but always keep them consistent across every link in a campaign.
| Parameter | Purpose | Paid Search | Social Media | Organic Social | Podcast | |
|---|---|---|---|---|---|---|
utm_source | Traffic source | newsletter | google-ads | twitter | instagram | podcast-name |
utm_medium | Channel type | email | cpc | social | social | podcast |
utm_campaign | Initiative name | spring-sale-2026 | brand-keyword-q4 | product-launch | summer-promo | episode-42 |
utm_content | Creative / placement | hero-banner | ad-group-a | bio-link | story-link | show-note |
This table maps to the standard five UTM fields. The Trnqify AI UTM Assistant accepts a plain-language description of your campaign and fills in sensible defaults from this mapping, which you can then review and adjust.
Step 2: Validate UTM Parameters and Encoding
With the values decided, assemble the full long URL. Tracking parameters append to the URL as a query string, where a question mark separates the base address from the tracking data, and an ampersand separates each key-value pair, following Google’s manual UTM format.
If the destination URL already contains a query parameter, join the tracking values using an ampersand rather than a second question mark. When the destination features a fragment identifier starting with a hash symbol, place the entire query string before that hash.
Using the previous example, the correctly assembled URL looks like this:
https://shop.example/sale?variant=blue&utm_source=instagram&utm_medium=social&utm_campaign=spring-launch&utm_content=story-link#details
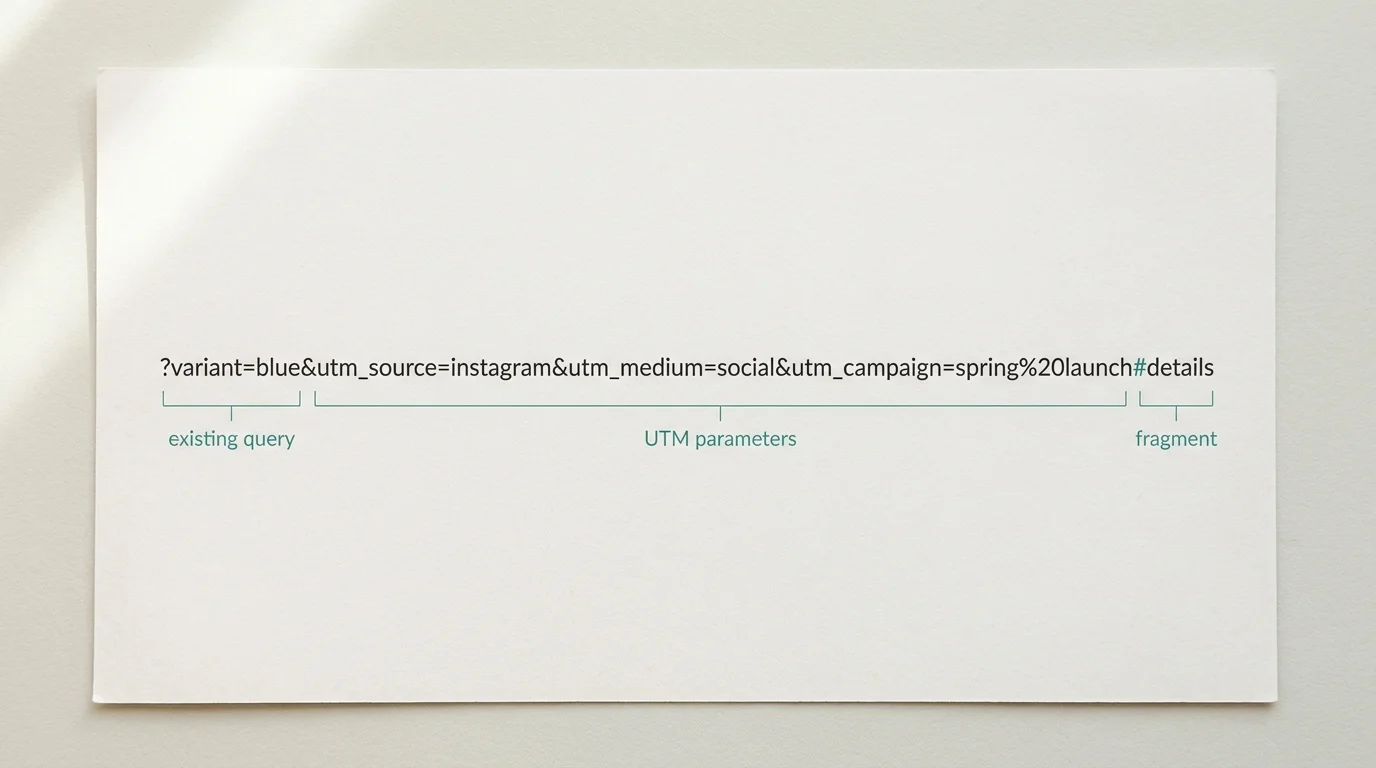
Inspect the key-value pairs for missing fields, duplicated parameters, or misspelled names. Pay special attention to characters that affect URI parsing, because RFC 3986 identifies the number sign (#) as a URI component delimiter.
If a campaign value contains a character that normally acts as a delimiter, percent-encode it so the destination reads it as part of the value. An ampersand used within a campaign name can be encoded as %26, and a space can be percent-encoded as %20. Leaving an ampersand unencoded can make the receiving system interpret the following text as a new parameter, changing the campaign value. Avoid encoding an already encoded value, which can turn %20 into %2520 and leave the analytics platform with a different campaign value than intended.
The Trnqify AI UTM Assistant accelerates this drafting process by applying tags automatically based on a prompt. Always review its output against the chosen naming plan before finalizing the link, and apply this same scrutiny to programmatic links. When building automated workflows with MCP or connecting directly via the REST API, parse the returned URL output to ensure the parameters meet the exact formatting requirements before distribution.
Step 3: Follow the Short Link to Its Final Destination
Take the validated long URL and use it as the destination for the short link. If the link management interface exposes the saved destination URL, compare it directly with the approved draft to confirm you have not accidentally shortened an untagged URL or an earlier version of the tracking string.
Instead of stopping at the creation response, open the actual short link and follow the redirect to its final destination. Paste the short URL into a fresh browser session and wait for the page to finish loading completely. Check the address bar to ensure the final URL contains all expected UTM parameters and any required destination parameters, such as the original variant=blue query.
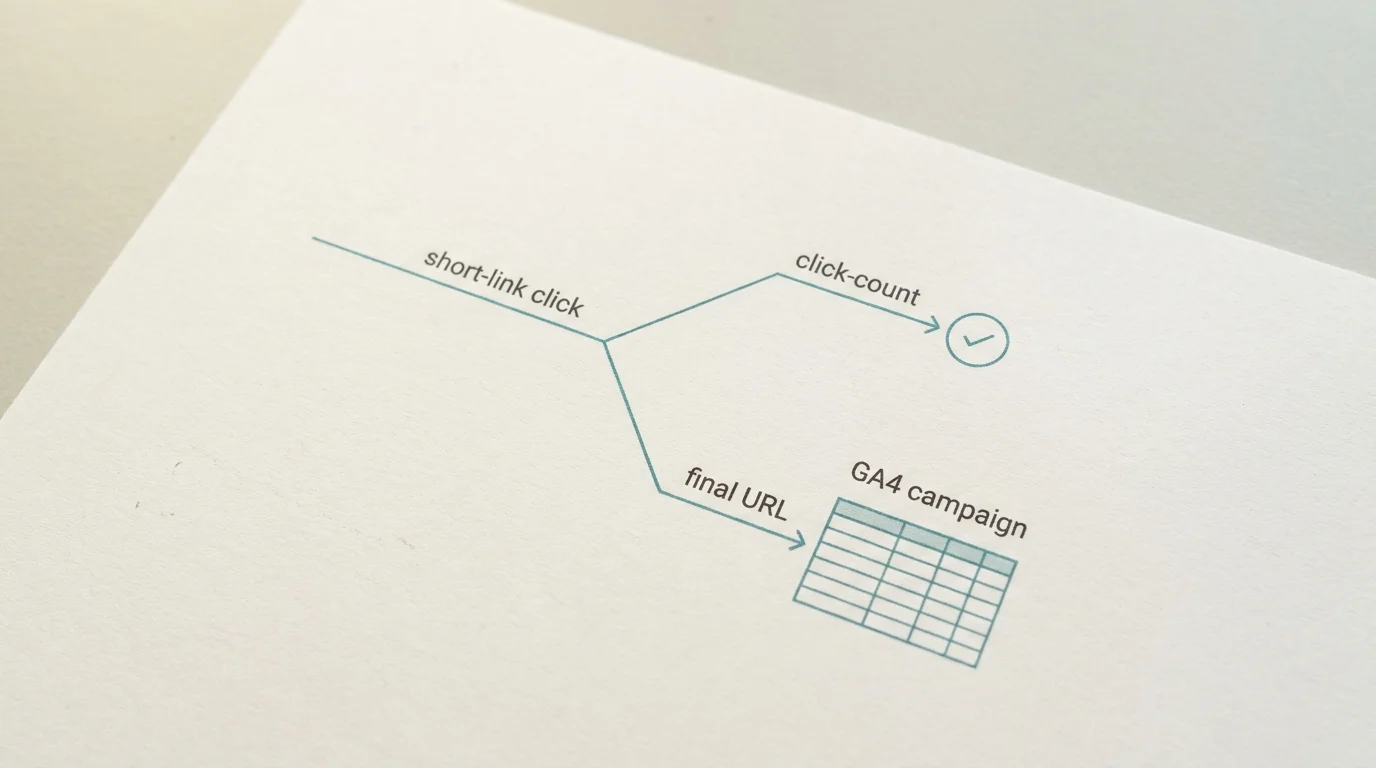
Some redirects happen too quickly to observe visually, or they bounce through multiple intermediate domains before reaching the final page. To track these, open the browser’s developer tools and select the Network panel. Check the option to preserve the log so the history remains visible after the page navigates. Once you paste the short link into the address bar and press enter, follow the requests in the Network panel and inspect each response. Then compare the destination URLs to confirm the tracking tags survive every hop.
If you plan to distribute the link through a platform that alters or rewrites URLs, test the link through that specific publishing route. Some social media apps may open links in their own in-app browsers, append their own tracking parameters, or strip external ones. Twitter/X often appends its own ref_src and ref_url parameters; LinkedIn can rewrite the destination through rsrc.linkedin.com; Facebook opens links inside its in-app browser, which sometimes appends tracking fragments. Sending the short link to a test account on the target platform and tapping it on a mobile device helps verify whether the parameters survive that platform’s specific handling.
Trnqify provides detailed per-link and account-wide analytics, showing redirect-level click activity the moment a user triggers the short link. While a click count in the Trnqify dashboard confirms the short link works, checking the final destination URL confirms that the tags survived the redirect, and checking destination analytics confirms whether the platform recorded the session.
Step 4: Verify the Campaign in GA4
Once you confirm the redirect preserves the tracking string and the final page loads correctly, check how the destination analytics system interprets the visit. These platforms read incoming query strings and map recognized values to reporting dimensions, while missing or unrecognized values may leave dimensions blank or cause visits to appear under unexpected categories.
Wait for the test visit to process, since timing varies by report and property. For a quick GA4 check, Google’s data-freshness guidance says Realtime data is typically available within a few minutes but covers fewer dimensions and metrics; standard intraday data typically takes 2 to 6 hours for standard properties in the Normal tier, and reports may continue to change for 24 to 48 hours.
For the full report check, log into the GA4 property and navigate to the Reports section. Open the Acquisition collection and select the Traffic acquisition report. The report includes Session source/medium and Session campaign, which Google’s URL-tagging documentation lists as available acquisition dimensions.
By default, the primary dimension in this report is the Session default channel group. Click the dropdown arrow next to that column header to change it to Session source/medium, and then click the plus icon next to the primary dimension to add a secondary dimension. Select the Traffic source category, followed by Session campaign.
Search the table for the exact values used in the test URL. If the UTM string was utm_source=instagram&utm_medium=social&utm_campaign=spring-launch, a row displaying instagram / social appears in the first column and spring-launch in the second.
Missing UTM parameters can cause campaign dimensions to appear as (not set), as Google’s URL-tagging guidance notes, so check the final URL before assuming the session failed to record. If the values appear correctly but GA4 assigns the visit to an unexpected default channel group, compare utm_source and utm_medium with the channel you intended.
Troubleshoot UTM Failures Before You Publish
When a test fails, the symptoms usually point to a specific point of failure in the URL syntax, the redirect chain, or the analytics configuration. Address these issues systematically before modifying the live link.
If the campaign appears split across multiple rows in the analytics reports, check for inconsistent capitalization in the published links. Because Google Analytics treats values such as Email and email as distinct, using a consistent lowercase naming rule helps prevent reporting fragmentation.
If a campaign value is cut off or misread in the analytics report, inspect the final URL and simplify the campaign slug to make it easier to review.
When the short URL looks correct in the builder but the destination page loses the tags upon loading, a redirect or destination-side rewrite may be at fault. Inspect the final URL after all network hops. If the tags are missing, check the original URL structure to ensure they sit before the hash symbol, as tags placed after the hash belong to the fragment rather than the query string. If the tags are positioned correctly but still disappear, the destination server or an intermediate proxy may be stripping query parameters during the redirect process.
If the shortener counts a click but GA4 shows no campaign data, check both the destination setup and report processing time. Confirm the final URL still contains the tags, and verify the destination site is firing its tracking scripts. While a short-link click count confirms a request reached the redirect, checking the session in analytics validates the attribution.
Complete this entire testing routine before launching any major initiative. Confirm the final URL syntax, follow the published redirect route, check the specific analytics values, and isolate the test link so the QA activity remains distinguishable from real customer performance. A validated setup helps keep the marketing data intact from the initial click to the final campaign report.
Pre-Launch UTM Testing Checklist
Use this checklist to confirm every step is covered before you publish a campaign. Check each item off as you complete it, and save the list alongside your campaign documentation for future reference.
- Destination URL confirmed — The exact landing page (including existing query parameters and fragments) is the base of your tagged URL
- Naming convention defined — All five UTM fields use a consistent style (lowercase, hyphens as separators) documented for the team
- UTM string assembled — Parameters append correctly using
?(first) and&(subsequent), with the query string placed before any#fragment - Special characters encoded — Ampersands, spaces, and other reserved characters in campaign values are percent-encoded (
%26,%20) - Short link destination verified — The saved destination in the short-link manager matches your approved tagged URL (not an untagged or earlier version)
- Redirect preserves parameters — Opening the short link in a fresh browser shows all UTM values in the final address bar (check via Network panel if redirects are fast or multi-hop)
- Platform-specific handling tested — If distributing through social media, email clients, or messaging apps, test the link within each platform’s native context (in-app browsers can behave differently)
- GA4 confirms campaign data — After the processing window, the Traffic acquisition report shows the expected
utm_source,utm_medium, andutm_campaignvalues (not(not set)) - Test link isolated — The test URL uses a unique campaign name (e.g.,
test-spring-launch-Q4-2026) so QA sessions don’t contaminate live campaign data
Trnqify combines AI-assisted campaign creation with privacy-conscious link measurement. Turn plain-language prompts into consistently tagged short links, manage them securely, and track redirect-level clicks without cookies or scripts on the shared links. Try Trnqify free and start building better campaigns today.
Frequently Asked Questions
How do I test UTM parameters before launch?
Build the tagged URL with your chosen parameters, create a short link pointing to it, open that short link in a fresh browser session, verify all parameters appear in the final address bar after redirect, and confirm the destination analytics system records the session under the correct campaign values.
What happens if UTM parameters get stripped by a redirect?
When an intermediate server, proxy, or link shortener strips query parameters, the destination page receives a clean URL without campaign data. The result is that GA4 (or whichever analytics platform you use) attributes the visit to '(direct)' or 'referral' instead of your intended campaign, breaking attribution. Always inspect the final URL after all network hops using the browser's Network panel to confirm parameters survive every redirect.
Why does GA4 show different campaign values for the same UTM tag?
Google Analytics treats parameter values as case-sensitive. Spring-Launch and spring-launch appear as separate campaigns in your reports. The fix is to adopt a consistent naming convention — typically lowercase with hyphens — and apply it across every link in the campaign. The Trnqify AI UTM Assistant enforces this by converting all generated values to lowercase automatically, which you can verify before distributing the link.
What is the difference between a UTM builder and a UTM checker?
A UTM builder generates tagged URLs from your inputs (source, medium, campaign). A UTM checker validates an existing URL to confirm the parameters are correctly formatted and encoded. The Trnqify tool combines both: it builds a tagged URL from your prompt, then lets you inspect and validate every parameter before distribution.
How long does it take for UTM data to appear in GA4?
Realtime reports typically show test visits within a few minutes, though with fewer dimensions and metrics. Standard intraday reports usually take 2 to 6 hours for properties in the Normal tier, and data may continue updating for 24 to 48 hours. If your test visit doesn't appear immediately, wait the full processing window before concluding there is a problem.
Can social media platforms strip UTM parameters?
Yes, though they more commonly append their own tracking parameters rather than stripping yours. Twitter/X adds ref_src and ref_url; LinkedIn can rewrite the destination through a redirect proxy; Facebook opens links inside its in-app browser, which may add tracking fragments. The safest approach is to test the exact distribution method you plan to use — open the link within the actual platform, not just in a standalone browser.